Electronic Travel Yahtzee
Posted onMy wife loves Yahtzee, but the problem with Yahtzee is that, as most games involving rolling dice, it's particularly hard to play on the go and has been relegated to the dinner table. This year, I decided to remedy that and make her a more portable version of the game.
The result is a pocketable device with a machined aluminum case, tactile buttons, LED dice displays, and a custom PCB running firmware I compiled to WASM for browser-based testing before the hardware even arrived. You can try the simulator yourself to see how it plays. The whole project took about 5 weeks from initial concept to assembled, working device.
Design Constraints
Going into this project, I knew I wanted something that felt premium and played like the actual game, so I set myself a few constraints:
- No screens: Yahtzee is a tactile game and I wanted my travel version to stay as analog as possible. Touching a pane of glass would defeat that purpose.
- Pocketable: if it doesn't fit in your pocket, it's not travel friendly.
- Premium: we're talking Christmas present here, a cheap 3D printed plastic case won't cut it.
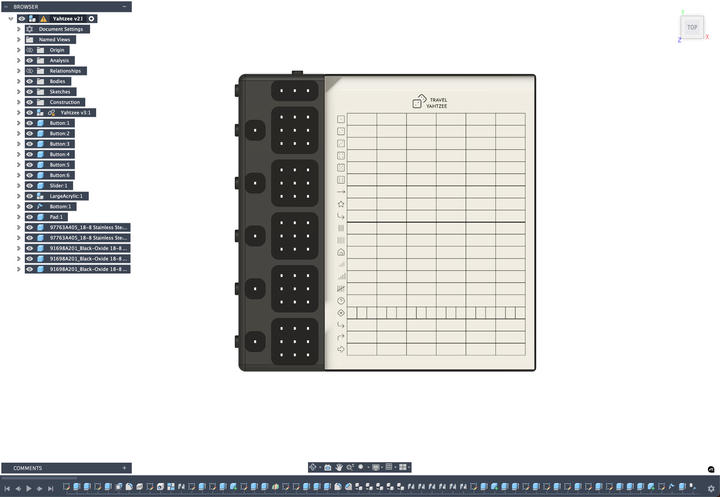
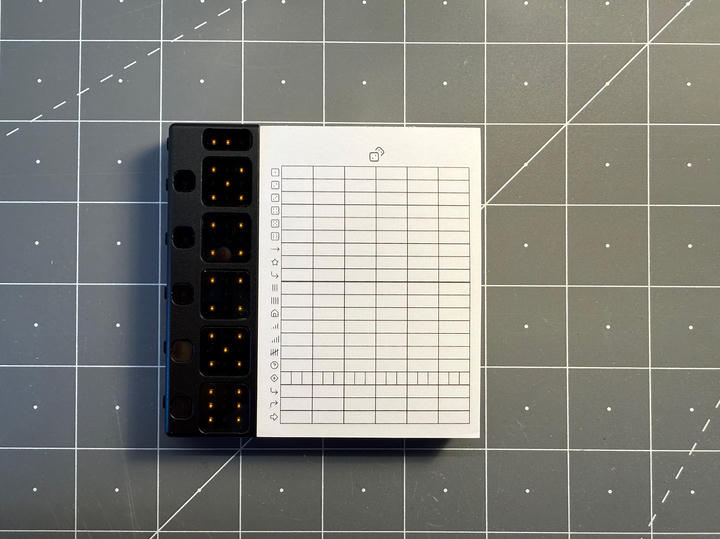
With this in mind, I knew I needed to keep a physical paper score pad: writing down the combinations you roll and tallying your score at the end is all part of the experience. I found a company that makes custom score pads with no minimum order, and in a happy accident, the height of their smallest pad is almost exactly 5 dice tall. This essentially determined the entire layout and dimensions of the device.

Electronics
With the form factor determined, I started working on the electronics. The device needed to:
- Generate random dice rolls
- Display the values of 5 dice
- Show the number of remaining rolls
- Lock and unlock individual dice
- Handle button inputs
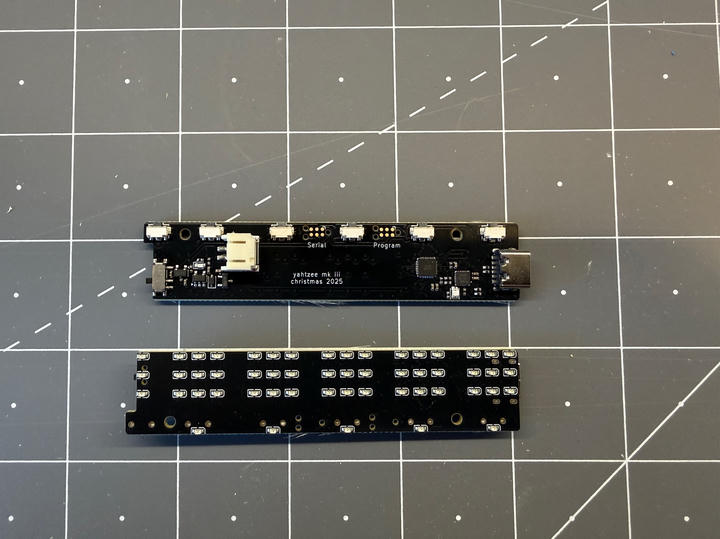
For the dice displays, I opted for a 3×3 grid of LEDs for each die instead of the traditional 7-LED arrangement. While only 7 LEDs are needed to show dice faces, the 3×3 grid would prove useful later for scrolling text and animations. I added a few more LEDs to indicate remaining rolls and the locked status for each die, along with buttons for rolling and locking.
I selected an ATtiny1616 as the microcontroller, more than enough computing power to run the game logic and handle all the I/O. An IS31FL3729 matrix LED driver handles all the LEDs, freeing up GPIO pins and simplifying the routing. For power, I used the same USB-C rechargeable battery circuit I've iterated on across multiple projects.

I routed the PCB as a 4-layer board (necessary given the routing density with so many LEDs in such a small space). The board went to JLCPCB for fabrication and SMT assembly. Given the size constraints, I used 0402 components throughout, and I definitely didn't want to hand-solder dozens of those.
Case
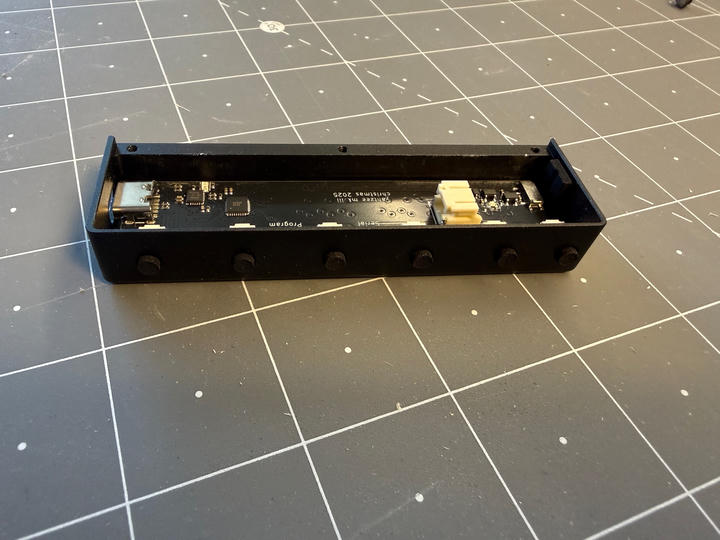
The case design was straightforward in some ways (the score pad dictated both the height and thickness) but challenging in others. I wanted a machined aluminum case with anodized finish to meet the "premium" constraint. Each LED area needed a recessed pocket where I could inlay a small piece of acrylic to diffuse the light.
Space was extremely tight, so I designed custom buttons and sliders from scratch. Having these small mechanical parts machined from metal would have been prohibitively expensive, so I had them printed in MJF nylon instead. They turned out wonderfully: the buttons are satisfyingly clicky and tactile, exactly what I was hoping for.
I sent the metal parts to JLCCNC for manufacturing, the acrylic diffusers to Ponoko, and the buttons and sliders to CraftCloud3D. For the LEDs, I chose warm amber instead of white (less harsh on the eyes and it gives the device a nicer aesthetic).
Software
While waiting for the hardware to be manufactured, I turned my attention to the firmware. From the start, I decided to treat this as a "serious" project and introduced a Hardware Abstraction Layer (HAL) to cleanly separate the application logic from the hardware-specific code.
Architecture
The HAL acts as an interface between the game logic and the actual hardware. The application code makes calls like "turn on LED (2,3)" or "read button 5" without knowing anything about the underlying hardware registers or protocols. This separation enabled some powerful development workflows.
Randomness
The random number generation uses a linear congruential generator, re-seeded with the number of milliseconds since power-on whenever the player presses the roll button. This ensures each game session produces a different sequence of rolls.
Testing
By writing a virtual HAL that targets my development machine, I was able to write comprehensive tests for all the game logic with 100% code coverage. The tests run on my laptop, not on the microcontroller, but exercise the exact same application code that runs on the device. This caught several edge cases in the game state machine before I ever had hardware in hand.
WASM Simulator
The HAL abstraction had another benefit: I could create a different virtual HAL targeting HTML/JavaScript. By compiling the firmware to WebAssembly with this HAL, I built a browser-based simulator that runs the actual game logic. You can click around and play with it yourself; it's the real firmware, just running in your browser instead of on an ATtiny.
This let me test and iterate on the gameplay experience weeks before the PCBs arrived. I could tweak the state machine, adjust timing, and get a feel for how the game would play without waiting for hardware.
Features and Polish
With the core game logic working, I added some polish features. The 3×3 LED grids really shine here:
- A scrolling splash screen that displays "Hello Molly" on power-up
- A dice rolling animation when you press the roll button
- A firework-like animation when you roll a Yahtzee
- A settings UI (accessible via long-press on the bottom button) where you can toggle animations, adjust brightness, and check battery level
These small touches make the experience feel delightful. The rolling animation, the way the display wipes between turns, the Yahtzee celebration: they all add personality to what could have been a straightforward electronic dice roller.
Hardware Validation
When the PCBs finally arrived, I used a PICkit 5 programmer to flash the firmware via UPDI. Before loading the full game, I wrote several simple test firmwares to validate the HAL: one to test individual buttons, one to cycle through LEDs, one to read the battery ADC. These isolated tests let me verify that the low-level hardware code worked correctly. By the time I flashed the actual game firmware, everything just worked.

Assembly
After several weeks, all the manufactured parts arrived. The PCB you see in these photos is actually the third revision (I iterated twice, first to switch from white to amber LEDs, then to add battery level monitoring via the ATtiny's ADC).

Packaging
While ordering the custom score pads, I noticed that the same company makes custom game boxes with no minimum order quantity. This felt like the perfect finishing touch for a "premium" gift, so I took a photo of Molly and used ChatGPT to turn it into an illustration of her throwing dice (AI being notoriously bad at generating realistic dice I needed to do a little cleanup using PhotoShop). That became the box art.

Outcome
I gave it to Molly on Christmas morning and she loved it! The device runs for weeks on a single charge, though I haven't run exact battery life tests. I had assembled a second one, so now we play Yahtzee together sitting on the couch. The animations and small details really make the experience: it's not just functional, it's genuinely delightful to use.